# Images
- Images can make a site much more attractive/clear
- Images can frustrate a surfer when they
- slow down the site
- lack quality
- ...
- Working correctly with images is a challenge!
# Possible file types
- File types of images that we can use in the
bodypart and which can be easily displayed by browsers:
| GIF | JPG | PNG (8) | PNG (32) | SVG | |
|---|---|---|---|---|---|
| Bits | 8 | 24 | 8 | 24 + 8 for α channel | 24 + 8 for α channel |
| Colors | 256 | 16M | 256 | 16M | 16M |
| Transparency | index | - | index - alpha (α) | alpha (α) | alpha (α) |
| Image type | raster | raster | raster | raster | vector |
| Animation | yes | - | - | - | - |
| Compression | lossless | lossy | lossless | lossless | lossless |
| Ideal for | logo - icon | photo | logo - icon | logo - icon | logo - icon |
- In the
headsection you can also use the ICO file type for favicons
# Recommendations
- GIF: for animated GIFs
- Childish, non-professional
- Revival thanks to social media / https://giphy.com/, although these GIFs on social media are often not GIF files anymore!
- You can make your own animated GIF via http://gifmaker.me/
- JPG: for photo material (a picture taken with your camera or smartphone)
- PNG: for small images with transparent background (can be created using Photoshop)
- SVG: for logos that can be enlarged without loss of quality (can be created via http://editor.method.ac/, with Photoshop, ...)
# Example
- Compare file size with/versus image quality
- Exercise: open the sandbox and change the color of the SVG-star to
#009cab
REMARK: ADDITIONAL INFO ON COLORS
- In the RGB color system, a color is described by the amount
of red, green and blue light that is emitted
- In hexadecimal format, a color is denoted as
#RRGGBB, whereRR,GGandBBare the hexadecimal values of red, green and blue, ranging from00(decimal: 0) toff(decimal: 255)- When you have a symmetrical value in all color channels, a color can be denoted as
#RGB(e.g.#ee33aa=#e3a)
- When you have a symmetrical value in all color channels, a color can be denoted as
- Up to 16M (256³ = 16 777 216) colors can be defined this way
- In hexadecimal format, a color is denoted as
- Examples:
#000000=#000= black#666666=#666= grey (equal amounts of red, green and blue always results in a grey tone)#ffffff=#fff= white#ff0000=#f00= red#00ff00=#0f0= green#0000ff=#00f= blue#00283c= Thomas More blue#fa6432= Thomas More orange
# Favicon
- Small icon in browser tab
- File name: favicon.ico (old fashioned way) or anyName.png (modern way)
- Insert into
<head>part via<link/>tag

# favicon.ico (old fashioned way)
- Insert your favicon into the
<head>tag:<link rel="shortcut icon" href="favicon.ico">relindicates the relationship with the other filehrefrefers to the hypertext reference: the place where the linked content can be found- When the HTML file and favicon.ico are in the same folder, you only have to mention the filename
- Emmet tip:
link:favicon
<!DOCTYPE html>
<html lang="en">
<head>
    <meta charset="UTF-8">
    <title>Document</title>
    <link rel="shortcut icon" href="favicon.ico">
</head>
<body>
    <p>Lorem ipsum dolor sit amet, consectetur adipisicing elit. Animi, et!</p>
</body>
</html>
1
2
3
4
5
6
7
8
9
10
11
2
3
4
5
6
7
8
9
10
11
- Making your own favicon isn't that hard
- A site that can help you: http://www.favicon.cc/
TIP
When favicon.ico lives in the root of your website (e.g: https://mySite.com/favicon.ico) you can omit the link as the browser will find the icon automatically
# PNG - SVG favicon (modern way)
- Browsers have been supporting PNG (and SVG) as shortcut icons for some time now
- Currently realfavicongenerator.net and favicon.io offer a very good solution for all platforms
- After uploading 1 suitable image, you will receive a few lines of code and the appropriate icons for all platforms
# PNG icons
<!DOCTYPE html>
<html lang="en">
<head>
    <meta charset="UTF-8">
    <title>Document</title>
    <link rel="icon" type="image/png" sizes="32x32" href="/favicon-32x32.png">
    <link rel="icon" type="image/png" sizes="16x16" href="/favicon-16x16.png">
</head>
<body>
    <p>Lorem ipsum dolor sit amet, consectetur adipisicing elit. Animi, et!</p>
</body>
</html>
1
2
3
4
5
6
7
8
9
10
11
12
2
3
4
5
6
7
8
9
10
11
12
![]()
# SVG icons
![]()
# Image-related tags
| tag | description |
|---|---|
| <img/> | image |
| <figure> | graphical content |
| <figcaption> | caption (graphical content) |
# <img/>
- Tag to place an image in the webpage
- Inline element: should preferably be in a block level element
- Empty tag, written as
<img ...>or<img ... />
| attribute | required/optional | description |
|---|---|---|
| src | required | source; indicates the path to the image to be displayed |
| alt | required | provides an alternative text if a user cannot view the image for some reason (e.g. when the browser cannot find the image or when the page is read by a screen reader) |
| title | optional | tooltip when hovering over the image |
| width | optional | width of the image in pixels |
| height | optional | height of the image in pixels |
# Example: <img/>
<h1>Image attributes</h1>

<p>
  <img
    src="https://picsum.photos/id/1025/300/200"
    alt="Dog in blanket"
    title="Nice photo of a dog"
    width="300"
    height="200"
  >
</p>
<p>Author: Matthew Wiebe</p>
<p>Url: https://unsplash.com/photos/U5rMrSI7Pn4</p>
# src attribute
- The
srcattribute is used to set the path to the image - This can be an image hosted on another website (absolute path - hotlinking) like in the example above, but most of the time (e.g. in the next example) we will work with images within our own website folder structure (relative paths)
# width and height attributes
- Via the
widthandheightattributes we can tell the page that it has to preserve these exact dimensions for the image- This is very important when building the page, because images load slower than text. By specifying the width and height of images, the webpage is immediately built up correctly (the page knows for example where a paragraph following an image should be positioned) and the page is loaded faster.
- There are multiple ways of getting the exact dimensions of an image:
- Hover over the name of the image in your code editor
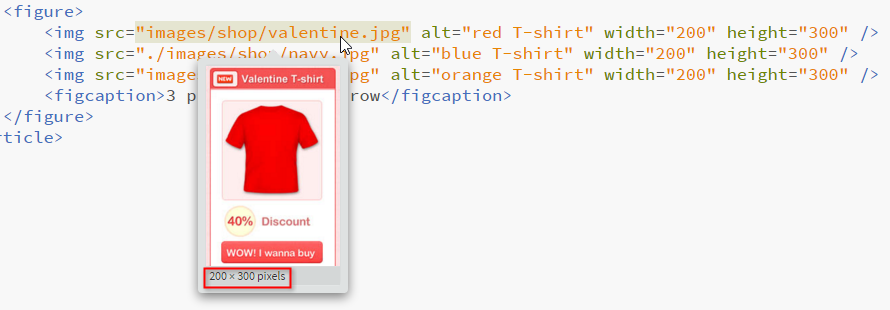
- Drag the image into a Google Chrome window
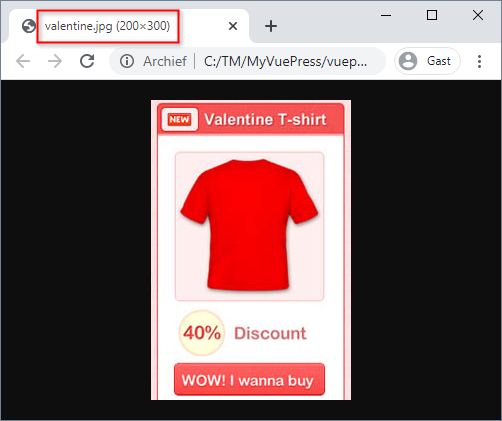
- Hover over the name of the image in your code editor
# <figure> and <figcaption>
- Each image should preferably be in a block element
- If an image does not really belong in a header or in a paragraph, you can put it in the block element
<figure> - You certainly do this when you want a caption or
<figcaption>for one or more images
# Example: <figure> and <figcaption>
# Document relative paths
- A large site often works with a lot of images, therefore a well organised folder structure is very important
- When working with a folder structure every image has a relative path to the HTML page/document that wants to show the image
- Let us explain how (document) relative paths works by the following folder structure:
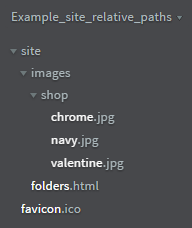
- The table below shows how we can use all the images in the folders.html page:
| image | relative position to HTML page | relative path | example |
|---|---|---|---|
| favicon.ico | 1 folder higher | ../ | <link rel="shortcut icon" href="../favicon.ico" /> |
| valentine.jpg | 2 folders lower | folder name/ | <img src="images/shop/valentine.jpg" alt="red T-shirt" /> |
| navy.jpg | 2 folders lower | folder name/ | <img src="images/shop/navy.jpg" alt="blue T-shirt" /> |
| chrome.jpg | 2 folders lower | folder name/ | <img src="images/shop/chrome.jpg" alt="orange T-shirt" /> |
REMARK
- The notation
./also exists. It means in the current folder.- valentine.jpg can also be accessed with the
./notation:<img src="./images/shop/valentine.jpg" alt="red T-shirt" />
- valentine.jpg can also be accessed with the
- When you put a site online, it might end up on a Linux server. Some rules need to be followed to make sure your website can navigate correctly to the images:
- Work with forward slashes (
/) - Encode the exact filename, with identical upper and lower case letters, including extension
- Work with forward slashes (
# Absolute paths (hotlinking)
- It is also possible to hotlink an image that can already be found on the internet
- You don't host the image yourself
- You refer to an
http(s)://-address to the place on the internet where the image is located = absolute path - For example:
<img src="https://upload.wikimedia.org/wikipedia/commons/d/d2/Hans_Holbein,_the_Younger_-_Sir_Thomas_More_-_Google_Art_Project.jpg" alt="Thomas More" />
- Advantages
- The texts (few kB) come from your own webserver and the image (many kB) comes from another domain
- You don't generate that much data traffic to your own web server, so a cheap hosting package from a web space provider is sufficient
- Disadvantage
- If the image hoster decides to replace, move or delete the (hotlinked) image, your page will also be affected!
WARNINGS
- Hotlinking is NOT allowed because it is bandwidth theft ...
- ... EXCEPT when you are using a site specifically for hosting photographic material such as, for example:
# SVG
- Problem:
- Display resolution keeps increasing (full HD, 4K, 8K, ...)
- More and more screen sizes
- Solution: Scalable Vector Graphics, which are
- resolution independent
- scalable without loss of quality
- ideal for logos, icons, line drawings, ...
- NOT suitable for photos
- SVGs can be used in two ways
- SVGs can be saved in a .svg-file and called via the
<img/>-tag - SVGs can be encoded in the
bodypart of a webpage via the<svg>-tag
- SVGs can be saved in a .svg-file and called via the
REMARKS
- You'll only learn the basics for the time being
- You just need to be able to code very simple shapes in the body
- For complicated drawings use an editor like http://editor.method.ac/
# Tags related to svg
| tag | description |
|---|---|
| <svg> | scalable vector graphic |
| <line/> | line (x1, y1, x2, y2) |
| <circle/> | circle (cx, cy, r) |
| <rect/> | rectangle (x, y, width, height) |
| <polygon/> | polygon (points) |
| <ellipse/> | ellipse (cx, cy, rx, ry) |
WARNING
Note that - in contrast to other empty tags (<meta> or <meta/>, <img> or <img/>, ...) - the SVG-related empty tags listed above must be closed with />
# <svg>
- Inline element that allows you to define the code needed to create a SVG drawing in the browser
| attribute | required/optional | description |
|---|---|---|
| width | optional | width of the drawing |
| height | optional | height of the drawing |
REMARKS
- If you specify too small dimensions, part of the drawing will be "cut off"
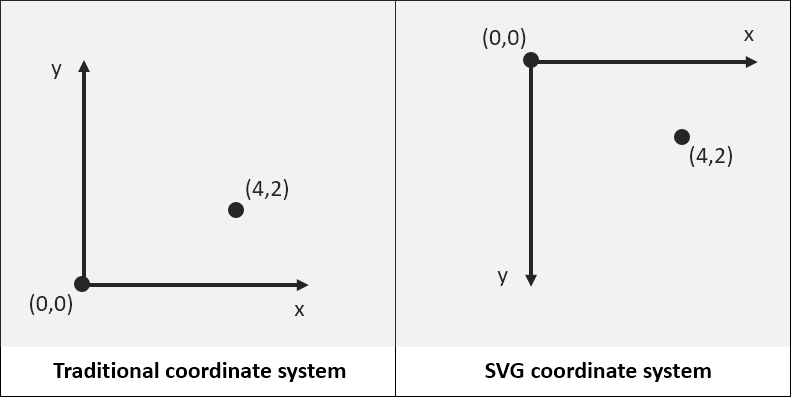
- The SVG coordinate system is a mirrored version of the traditional coordinate system used in mathematics: our origin is at the top left corner, and if we move downwards we get higher y-values
# <line/>
- Use the
<line/>tag to draw a line
| attribute | required/optional | description |
|---|---|---|
| x1 | required | x-coordinate of point 1 |
| y1 | required | y-coordinate of point 1 |
| x2 | required | x-coordinate of point 2 |
| y2 | required | y-coordinate of point 2 |
| stroke | required | stroke color |
| stroke-width | optional | stroke width (default: 1 pixel) |
# <circle/>
- Use the
<circle/>tag to draw a circle
| attribute | required/optional | description |
|---|---|---|
| cx | required | x-coordinate of the center |
| cy | required | y-coordinate of the center |
| r | required | radius |
| fill | optional | fill color (default: black) |
| stroke | optional | stroke color |
| stroke-width | optional | stroke width (default: 1 pixel) |
| paint-order | optional | stroke on top of or behind fill (default: on top of fill) |
# <rect/>
- Use the
<rect/>tag to draw a rectangle
| attribute | required/optional | description |
|---|---|---|
| x | required | x-coordinate of the top left corner |
| y | required | y-coordinate of the top left corner |
| width | required | width of the rectangle |
| height | required | height of the rectangle |
| fill | optional | fill color (default: black) |
| stroke | optional | stroke color |
| stroke-width | optional | stroke width (default: 1 pixel) |
| paint-order | optional | stroke on top of or behind fill (default: on top of fill) |
# <polygon/>
- Use the
<polygon/>tag to draw a polygon
| attribute | required/optional | description |
|---|---|---|
| points | required | enumeration of pairs of x,y coordinates of the different vertices, in the order in which they are to be drawn |
| fill | optional | fill color (default: black) |
| stroke | optional | stroke color |
| stroke-width | optional | stroke width (default: 1 pixel) |
| paint-order | optional | stroke on top of or behind fill (default: on top of fill) |
# <ellipse/>
- Use the
<ellipse/>tag to draw an ellipse
| attribute | required/optional | description |
|---|---|---|
| cx | required | x-coordinate of the center |
| cy | required | y-coordinate of the center |
| rx | required | horizontal radius |
| ry | required | vertical radius |
| fill | optional | fill color (default: black) |
| stroke | optional | stroke color |
| stroke-width | optional | stroke width (default: 1 pixel) |
| paint-order | optional | stroke on top of or behind fill (default: on top of fill) |
REMARKS
- Half of the stroke (width) is always drawn on the inside of the fill, the other half on the outside of the fill
- A stroke overlaps the filling by default (as it is painted last/on top of the fill)
- By using
paint-order="stroke", only the outside half of the stroke will be visible (as the stroke will be painted first/behind the fill)
<svg width="100" height="100">
  <circle cx="50" cy="50" r="30" fill="#FA6432" />
</svg>
<svg width="100" height="100">
  <circle cx="50" cy="50" r="30" fill="#FA6432"
    stroke="#00283C" stroke-width="20" />
</svg>
<svg width="100" height="100">
  <circle cx="50" cy="50" r="30" fill="#FA6432"
    stroke="#00283C" stroke-width="20"
    paint-order="stroke" />
</svg>
# Example: <svg>
- As illustrated in the Combine... example, several forms can occur in one
<svg>tag: the first shape you draw is at the bottom of the stack
<h1>DIY: SVG</h1>
<h2>Line</h2>
<svg width="100" height="100">
  <line x1="0" y1="0" x2="100" y2="100" stroke="red" stroke-width="10" />
  <line x1="100" y1="0" x2="0" y2="100" stroke="red" stroke-width="10" />
</svg>
<h2>Circle</h2>
<svg width="100" height="100">
  <circle cx="50" cy="50" r="50" fill="darkSeaGreen" />
</svg>
<h2>Rectangle</h2>
<svg width="150" height="100">
  <rect x="50" y="10" width="100" height="60" fill="hotpink" />
</svg>
<h2>Polygon</h2>
<svg width="100" height="100">
  <polygon points="0,0 100,100 0,100" fill="purple" />
</svg>
<svg width="26" height="14">
  <polygon points="13,0 26,14 21,14 13,5 5,14 0,14" fill="red" />
</svg>
<h2>Ellipse</h2>
<svg width="125" height="105">
  <ellipse cx="75" cy="75" rx="50" ry="30" fill="orange" />
</svg>
<h2>Combine...</h2>
<svg width="150" height="150">
  <ellipse cx="40" cy="50" rx="30" ry="25" fill="black" />
  <ellipse cx="100" cy="50" rx="30" ry="25" fill="black" />
  <circle cx="70" cy="70" r="50" fill="green" />
  <circle cx="55" cy="55" r="10" fill="white" />
  <circle cx="55" cy="55" r="5" fill="black" />
  <circle cx="85" cy="55" r="10" fill="white" />
  <circle cx="85" cy="55" r="5" fill="black" />
  <polygon points="50,90 90,90 80,100 60,100" fill="black" />
  <rect x="60" y="90" width="5" height="5" fill="white" />
  <rect x="67" y="90" width="5" height="5" fill="white" />
  <rect x="74" y="90" width="5" height="5" fill="white" />
</svg>
<svg width="150" height="150">
    <ellipse cx="40" cy="50" rx="30" ry="25" fill="black" />
    <ellipse cx="100" cy="50" rx="30" ry="25" fill="black" />
    <circle cx="70" cy="70" r="50" fill="green" />
    <circle cx="55" cy="55" r="5" fill="black" stroke="white" stroke-width="10" paint-order="stroke" />
    <circle cx="85" cy="55" r="5" fill="black" stroke="white" stroke-width="10" paint-order="stroke" />
    <polygon points="50,90 90,90 80,100 60,100" fill="black" />
    <line x1="63" y1="90" x2="63" y2="95" stroke="white" stroke-width="5" />
    <line x1="70" y1="90" x2="70" y2="95" stroke="white" stroke-width="5" />
    <line x1="77" y1="90" x2="77" y2="95" stroke="white" stroke-width="5" />
</svg>
# Working correctly with images
# Size of images
- Images that you want to display in a webpage should not be too large, because then the page will load too slow
- Keep the file size as small as possible and aim for images smaller than 100kB
- Make sure the image fits on your screen
- Logos and simple drawings preferably in SVG format
- Google emphasizes this very strongly: use Chrome in developer view (
F12) and request a 'Lighthouse' audit
# Correct scaling of images
- Place your own images on the internet and resize them correctly using
- Photoshop
- Sites like http://picresize.com/ and https://bulkresizephotos.com/
- …
- Always scale your images with the correct aspect ratio, so proportional!
REMARK
- It makes no sense at all to place an image on your web space in its original size and then to use
widthand/orheightto display it small ...- You frustrate the surfer (and Google): they are forced to download too many kB (the original image), while they only see a smaller version of the image
# Do not violate any rights
- Use only images that are licensed to reuse
- Correct Googling
- Google allows to search for images under Creative Commons licenses, but recommends to review the licensing requirements of any image you want to use in detail (as even the majority of these CC-licensed images may only be used freely under specific circumstances: credit to the author, non-commercial use only, no adaptations allowed, ...)!
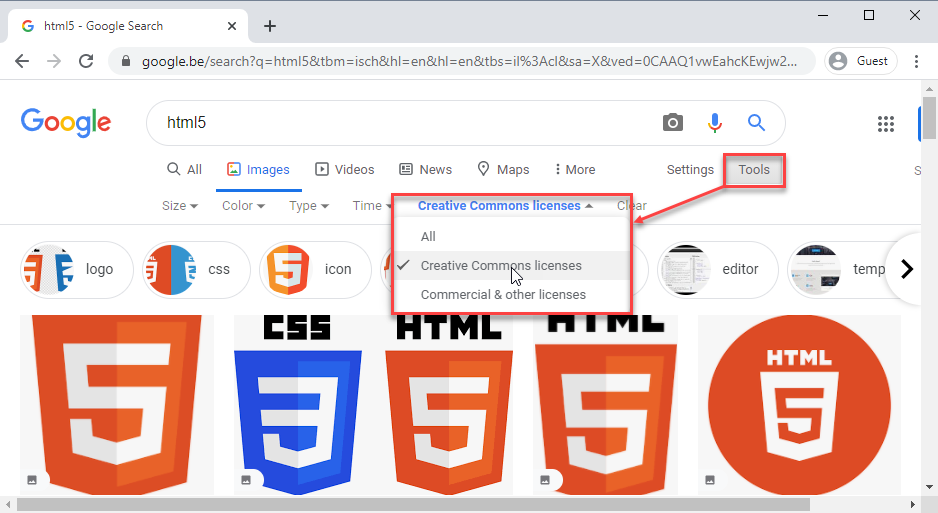
- Google allows to search for images under Creative Commons licenses, but recommends to review the licensing requirements of any image you want to use in detail (as even the majority of these CC-licensed images may only be used freely under specific circumstances: credit to the author, non-commercial use only, no adaptations allowed, ...)!
- Sites like Pexels, Unsplash, ...
- Correct Googling
- No infringements against image/portrait rights
# Composition care
- If you make photos yourself, make sure you have good photographic material
- Try to enhance the composition of your photos
# Provisional images
- If the customer is (too) late with the delivery of final photos for a website, you can use sites like LoremFlickr, Lorem Picsum, LoremPixel, PlaceIMG or Placeholder for temporary "placeholder" images